
Please make sure that you have installed at last Mestrelab License Server 2.2.0 on your server machine and that all the users are running the lastest Mnova version on their computers.
- Download the license server setup file: For windows or For Mac
- Download the latest Mnova version
Instructions for Windows Servers
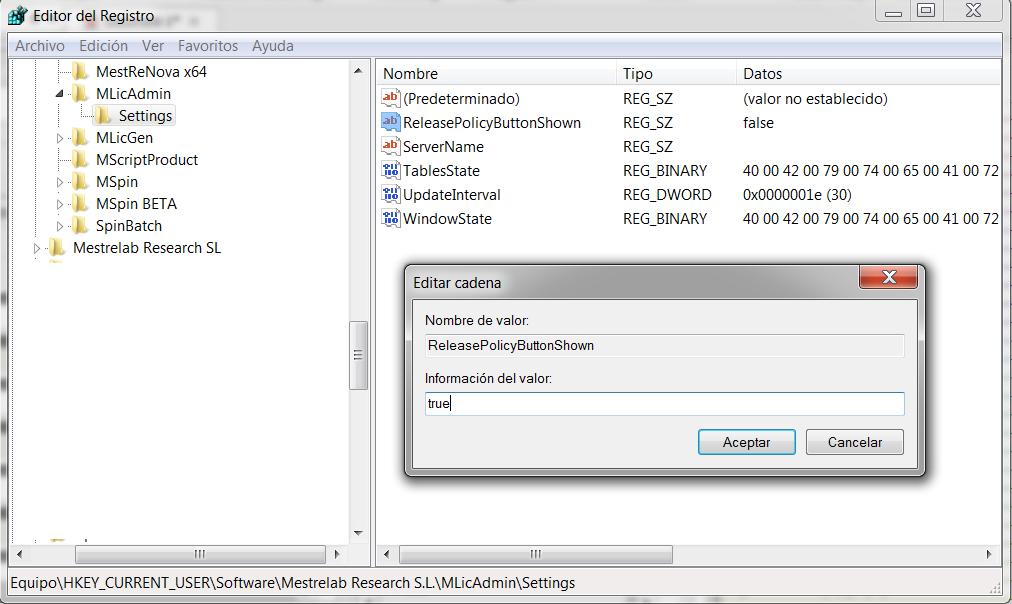
Run ‘regedit’ from the Windows Start menu.
Navigate to:
HKEY_CURRENT_USER\SoftwareMestrelab Research S.L.M\LicAdmin\Settings\ReleasePolicyButtonShown
And replace False with True, as you can see in the picture below:
Then, run MlicAdmin and click on the Release Policy button (red square in the picture below) to display the Idle Release Policy dialog box, where you will be able to select the desired Timeout (Minimum value* = 30 minutes).
If you check the box 2 minutes warning, the user will get a warning message telling that the session will be closed in 2 minutes.

*You can entry a TimeOut of 10 minutes, but in this case, after following the steps described above, you will need to create a new registry entry (type DWORD32) called 'MinTimeout' and once there, customize the value for 10 min.
If your OS is a 32 bit, you will need to create the MinTimeout registry here: HKEY_LOCAL_MACHINE\SOFTWARE\Mestrelab Research S.L.\MLicServer\Settings\ReleasePolicy
If it is 64 bit:
HKEY_LOCAL_MACHINE\SOFTWARE\Wow6432Node\Mestrelab Research S.L.\MLicServer\Settings\ReleasePolicy

Then you also need to edit the 'Timeout' entry to 10 (if this Timeout entry has a value higher or equal to 30, the MinTimeout will not give any effect).
Finally restart the server.
After that, if you go to MLicAdmin/Release Policy you can see that the Idle timeout is already 10 min.

Finally save the changes and restart MlicServer.
Instructions for Mac Servers
From the User's Home directory (or from a Terminal), please open the file located in: Library/Preferences/com.mestrelab.MLicAdmin.plist
And change the property Settings.ReleasePolicyButtonShown from 'N'o to 'Yes', as you can see in the picture below:

Then, run MlicAdmin and click on the Release Policy button to display the Idle Release Policy dialog box, where you will be able to select the desired Timeout (Minimum value = 30 minutes). You can also select a Timeout of 10 minutes, but in this case you would need to edit (by using PreffSetter, for example) the file com.mestrelab-research-s-l.MLicServer which is in System Preferences. Once there create a new key (Integer class) called Settings.ReleasePolicy.MinTimeout with the value of 10.
Note: Apple has changed some user privileges to edit your preferences. If the Release Policy button does not appear; please use the command 'defaults':
https://www.makeuseof.com/tag/hidden-mac-settings-defaults-command/
Finally save the changes and restart MlicServer.
Instructions for Linux Servers
From terminal type: /root/.config/Mestrelab Research S.L./MLicAdmin.conf Replace the line: ReleasePolicyButtonShown=false with ReleasePolicyButtonShown=true
For example:
[Settings]ReleasePolicyButtonShown=true
Then, run MlicAdmin and click on the Release Policy button to display the Idle Release Policy dialog box, where you will be able to select the desired Timeout (Minimum value = 30 minutes).
If you need to select a minimum value for the Timeout below 30 mins, please edit this file:
/opt/mestrelablicserver/lib/Mestrelab Research S.L./MLicAdmin.conf
and add to the "[Settings]" section the line: ReleasePolicy\MinTimeout=10
Finally save the changes and restart MlicServer.